Monday, 2 November 2015

Personal Work - Landscape Practice

A landscape illustration I am currently in the process of finishing. I've learnt that keeping an images colour hues closer together can create a much more harmonized and realistic image. As colours interact they change how they appear. And learning this is something I hope to achieve. In terms of this image so far i think the landscape composition works but something needs to be changed with the ships. I shall come back to this and try push it further with the results posted when they are had.


Game Arts - High Poly Asset

Project Overview

The final outcome of this project is to create a high poly asset based on a real object or realistic concept with the aim of having a near identical replication of the chosen reference. Using both Autodesk Maya 2016 and Zbrush to achieve this goal.

Choosing the Reference 

Choosing the correct object to replicate was a matter that took me a while to decide. I noticed many of my peers decided to model a high poly weapon, namely a gun, and whilst this was an interesting concept that could of led to me creating a popular video game gun such as Half Life 2's gravity gun in the end I felt that a weapon might be too generic. As a modeler I feel rather lack luster and wanted to try push my skills as far as one could. Therefore after much searching I settled on a fantasy half mask. With its organic shapes I felt this would be the challenge I need to improve my modelling skills. Reference image shown below.

Modelling - The Face

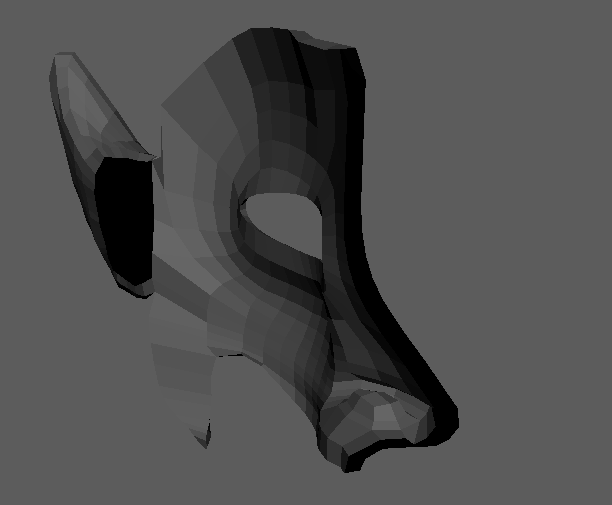
During class we had been shown Maya 2016's modelling toolkit. Specifically the Quad Draw function. I felt this to be a very strong tool and one I enjoyed using a lot. But for creating the mask it felt much too 2D and was a struggle to create the depth I wanted to begin the modelling process. Therefore I felt the best path to take was one of extruding with a concentration on edge flow. The image below shows my starting point, keeping the eye socket closed to begin with allowed me to concentrate on the topology for the time being.
From here I just kept extruding and bulking the face out a bit at a time using the front view as my main reference point but referring to the side views as needed. Eventually I managed to get the general shape correct yet I felt the edge flow to be a bit messy and the face feeling very rough.

Modelling - Smoothing

Before continuing with the model the topology needed to be cleaned and sorted in a nicer fashion. It wasn't too off but enough that problems could arise in the future if not cleaned now, at a point in time where it would be easier. The first step of doing this involved using the sculpting tools within Maya itself utilizing the grab and smooth functions to move the edge flow into better positions. Yet this wasn't enough. The next step was to take the model in Zbrush and remesh it using the inbuilt function within the program. This led to a much nicer edge flow

Modelling - The Ear

I was advised to duplicate the ear of the Zbrush example and to use that as my starting point to retain good edge flow. Once this was done it was just a matter of moving vertices back and forth until they were in the correct area. Since the mask has an elven kind of ear the points at the top had to be pulled right back.


Modelling - Mirroring

The next step was a simple one of mirroring and connecting the two halves together to create a combined mesh to finish the facial section of the mask of.

After that smoothing was the natural next step as a means to check how the edges are flowing and to check for any issues with the mesh. Luckily there were none.


Modelling - The Branches

The branches above the mask are the next section to be tackled and an area i'm a tad confused with. At the moment i'm just modelling it maya but on a separate layer so if it turns out Zbrush is a more effective tool for this I can just swap to it. 


Wednesday, 28 October 2015

Personal Work - Landscape Practise

A small 40 minute practice into landscapes and colours. It was fun using the blues and oranges together and I feel they work nicely together. I think this image needs a more obvious focal point though. Perhaps just infront of the current character as at the moment there is a small resting area in the sea but i think a stronger view point anchor is needed. 


Friday, 23 October 2015

Personal Work - Kindred Fanart

Some fan art of a character called Kindred from the game League of Legends. This was an interesting drawing to create due to the characters shapes and textures. Trying to create a feeling of fur and getting it to flow correctly was hard. I think I achieved in some areas and not in others but I feel progression was indeed made.

Tuesday, 20 October 2015

Games Production - Further Concepts

Environments

One if the first stages of designing any game is creating the world in which the game will take place in. This is important for a number of reasons. It allows world limitations to be set. The style and feel of the world. The mood of areas such as which areas would feel safe and which feel dangerous. 

Water Room

This was a concept for one of the puzzles rooms with a focus on water. By diverting the water around you could get things to move and thus unlock the puzzle. The room was supposed to feel vast but still enclosed with light zones acting as safe spots. Overall i'm happy with this piece as it was done in only 2-3 hours. Yet I feel that I need to break away from using the same camera angle and try more dynamic concepts.

Pressure Plate Room

A room concept for the first area where the player has to pick up and place a rock on the pressure plate to activate the door. I decided to try experimenting with colour schemes and this one went very blue/green. The colours themselves are interesting but I feel this scene would need a lot more development. But as a concept it serves its purpose.

Door Concept Sheet

Just a door concept sheet showing how the door would appear closed and open using forcefields/crystals instead of conventional doorways.


Wednesday, 23 September 2015

Game Production - Concept

Although my set role is that of the game designer I still feel that I can contribute to the group in terms of artwork as well. In an effort to put across some ideas and general atmosphere to the team members and to help the concept artist in their development of the games look and palette.

I decided to try create a quick and rough concept of the entrance area of our level to try play around with scale, colours, environment and similar things. The end result was better than i thought would occur for such a short timeframe. I decided to try my hand at a bit of photo manipulation with the rocks as well as some more use of colour dodge. In the end this led to some nice lighting and I hope for the concept artist to take this further or if not I will try and develop some further ideas.


Wednesday, 9 September 2015

Summer Project

The summer project assigned to us was to design and create a cyborg character. My first thought when approaching this topic was the over use of chrome metal and sleek robotics that has been synonymous with the cyborg image. I decided that I wanted to go for a different image and go for a more rusty/road warriors look. I suppose the recent movie Mad Max Fury Road would be more similar to what I have in mind. Taking a more scrapyard rustic approach to the robotic parts.

Initial Designs
The first step was to create a set of silhouettes to try and establish an interesting outline. Using this to act as a visual anchor points for the viewers eyes. Furthermore it helps the design sense of the character in question, being able to see the generic feel of each outline. The designs I managed to come up with all had their own qualities. With the far left feeling very punky and the one next to it seemingly more like a soldier or mercenary. I did establish that I perhaps I felt it would benefit the design to lean away from giant appendages as I didn't like how the fist or shield felt in this outline.


Defined Shapes
I then took the initial designs and tried to push a few of them a bit further, rendering out some aspects of them. Trying to find a feel for each cyborg character and working out if it was worth taking that particular design any further forward.

Material Study


Concept Art

Concept Sheet